
|
| 일 | 월 | 화 | 수 | 목 | 금 | 토 |
|---|---|---|---|---|---|---|
| 1 | 2 | 3 | ||||
| 4 | 5 | 6 | 7 | 8 | 9 | 10 |
| 11 | 12 | 13 | 14 | 15 | 16 | 17 |
| 18 | 19 | 20 | 21 | 22 | 23 | 24 |
| 25 | 26 | 27 | 28 | 29 | 30 | 31 |
중앙일보 : http://news.joins.com/article/20320036
------------------------------------------------------------------
각종 강연 및 저서를 통해 생태학과 관련하여 일반 대중이 쉽게 이해를 시켜주는 학자로서 훌륭하다고생각했는데, 인간적인 모습에서 또 한번 반하게 되네요.. 최재천 교수님!!
학문의 깊이만큼 인간적인 깊이가 있는 교수님이 존경 스럽습니다..!!
[출처: 중앙일보] [권혁재 사진전문기자의 뒷담화] 어린이 앞에 무릎 꿇은 최재천 국립생태원장
지난주 인터넷을 훑다가 한 장의 사진 앞에 얼어 붙게 되었다.
시상식 장면이었다.
그런데 상을 주는 어른이 무릎을 꿇고 어린이와 마주하고 있었다.
상을 받는 어린이는 배시시 웃고 있었다.
이야기를 품고 있는 듯한 사진이었다.
사진에서 떠날 수 없었다.
사연이 궁금했다.
무릎을 꿇은 어른이 최재천 국립생태원장이었다.
그래서 최원장과 통화를 했다.
겸연쩍은 듯 그가 들려준 사연은 이랬다.
“그게 얼떨결에 그렇게 된 겁니다. 지난달 15일, 우리 들꽃 포토 에세이 공모전시상식이 있었습니다. 수상자 대부분이 중·고등학생 이었습니다. 요즘 학생들 유난히 키가 크잖아요. 게 중에 아주 작은 초등학교 1학년이 껴있었습니다. 언니와 함께 장려상을 받게 되었는데 언니가 등을 떠밀었어요. 혼자 올라온 그 아이는 주눅든 듯 쭈뼜쭈뼛 했습니다. 그 순간 나도 모르게 그렇게 한 겁니다. 처음엔 그 아이가 흠칫했습니다. 겁나서 그렇니? 하고 물었더니 고개를 끄덕끄덕하고선 배시시 웃더라구요.”
사진을 확대해서 자세히 보고 싶었다.
국립생태원 홍보담당자에게 사진을 보내달라고 부탁을 했다.
그 사진뿐만 아니라 다음 장면 사진까지 보내왔다.
그 어린이와의 기념사진 장면이었다.
역시나 최원장이 무릎을 꿇고 있었다.
무릎을 꿇은 어른, 이는 생물학적인 어른이 아닌 진짜 어른의 의미가 담겨있었다.
오래전 찍은 최원장의 사진이 다시 보고 싶어졌다.
통화 후 지난 사진 파일을 뒤져 최원장의 사진을 찾았다.
2013년이었다.
이화여대 연구실 문에 색종이를 오려 만든 시계가 붙어 있었다.
삐뚤삐뚤한 손 글씨로 ‘할아버지 선생님께’라 적혀있었다.
그것을 보고 나도 모르게 웃음이 났다.
보자마자 저절로 웃음 짓게 만드는 묘한 힘을 가진 작품(?)이었다.
제자의 딸이 만들어 준 것인데 십 여 년째 그 자리에 있다고 했다.
두 벽 가득한 책장엔 열 댓 개의 포스트잇이 군데군데 붙어있었다.
책을 빌려간 학생들이 스스로 붙여 놓은 것이었다.
책이름, 날짜, 빌려간 이가 적혀 있었다.
그의 책은 ‘너와 나의 관계를 넘어 우리라는 울타리 안에 존재한다’는 것을 일러주는 듯했다.
그의 책상 뒤 벽은 연꽃과 나비와 벌이 그려진 벽지로 도배되어 있었다.
의자 바로 위 천장엔 기러기 모빌이 달려있었다.
그것의 용도를 물었을 때 최원장이 앉은 자리에서 손을 뻗어 줄을 당겼다.
기러기가 날개 짓을 했다.
천연덕스럽게 웃으며 기러기 모빌의 이야기를 들려줬다.
“멕시코에서 온 연구원이 원주민이 만든 거라며 가져다 준겁니다. 아무렇게나 매달아 놓았습니다. 그런데 나중에 방향을 재봤더니 각도가 신기하게도 딱 멕시코 방향이었습니다. 그 연구원과 서로 신기하다며 한 참 웃었죠.”
기러기 모빌의 줄을 당기며 설명하는 그의 눈빛과 표정이 묘했다.
어른인데도 천진난만한 애 같은 행복함이 담겨있었다.
마침 이날의 인터뷰 주제가 ‘행복’이었다.
최 원장은 “자신이 좋아하는 일로 먹고 사는 사람은 행복하다”고 했다.
그런데 그 행복은 “방황 속에서 찾아야 한다”고 했다.
“방황 속에서 찾아야 한다”는 그의 말이 의아했다.
동물생태학의 권위자답게 침팬지의 예를 들어 설명했다.
“서부 아프리카의 침팬지는 견과류를 돌로 깨 먹습니다. 어미가 깨트리면, 새끼도 따라서 하죠. 서툰 새끼는 실수 연발이죠. 그래도 어미는 말없이 지켜볼 뿐입니다. 무한 인내심으로 지켜보는 겁니다. 그럼 어느 순간 자식이 그걸 터득합니다. 야생의 세계에서 이런 고통과 방황이 중요합니다. 새끼들은 그걸 통해서 성장합니다. 인간의 세계도 마찬가지죠. 우리에겐 ‘아름다운 방황’이 필요합니다.”
‘아름다운 방황’이라는 말에 두 눈이 번쩍 뜨였다.
당시 심한 사춘기를 겪는 아들을 둔 내게는 남다른 위로의 말로 다가왔다.
그러면서 당신의 방황을 들려줬다.
수많은 방황을 겪은 만큼 꽤 긴 이야기였다.
요약하자면 이렇다.
“의예과를 두 번 떨어지고 2지망으로 서울대 동물학과에 들어갔다. 그러니 전공에는 별 흥미가 없었고 시와 사진 같은 데 관심이 더 많았다. 3학년 때 직함이 무려 9개나 될 정도로 오지랖이 넓었다. 사무실 출근하듯 다닌 학교였다. 이 모두 갈 길을 찾지 못한 방황이었다. 4학년 때, 유타대 조지 에드먼즈 교수와 엿새 동안 전국을 돌았다. 그 미국인 교수는 관광도 안 하고 하루살이만 채집했다. 그렇게 살고 싶었다. 교수 앞에 무릎을 꿇고 어떻게 하면 그렇게 살 수 있는지 물었다. 교수는 종이를 꺼내 미국 대학 목록 9개와 교수 이름을 써줬다.
유학을 결심했다. 아버지에게 1년치 학비만 대달라고 부탁했다. 죽더라도 거기서 죽겠다는 말까지 했다. 자식 넷 중에서 누구 하나를 택해서 투자를 해야 한다면 적어도 나는 아니라는 게 아버지의 답이었다. 가슴에 못이 박혔다. 그랬던 아버지가 회사를 그만두고 퇴직금의 일부를 떼 내게 줬다. 나는 출국하며 김포공항에서 대성통곡을 했다. 더 물러설 곳이 없었다. 미국땅에 도착하는 순간부터 죽어라 공부했다. 돌아보면 그런 고통과 방황이 나를 성장케 했다.”
취재 기자가 왜 미국인 교수에게 무릎을 꿇었는지 물었다.
“저는 자연 속에 잠길 때가 가장 행복했어요. 그런데 그걸로 밥 먹고 살기는 불가능한 줄 알았죠. 그래서 방황했었죠. 그런데 정확하게 그렇게 사는 사람이 내 앞에 나타난 겁니다. 내겐 길이었고 그 길로 가고 싶었습니다.”
방황 속에서 찾은 길, 지금 행복하다고 했다.
그러면서 정글 경험을 예로 들었다.
“비 맞는 걸 끔찍하게 싫어합니다. 그런데 열대에 가면 다릅니다. 비를 맞는 게 그렇게 좋을 수가 없습니다. 안경에 얼룩이 져도, 속옷까지 흠뻑 젖어도 상관없이 그냥 너무 행복합니다. 뱀 지나가죠, 개미핥기 나오죠, 개구리도 튀죠, 나비도 날죠. 정신없습니다.”
뱀, 개미핥기, 개구리, 나비 이야기를 하며 재미있는 동작이 스쳐 지나갔다.
양손을 귀 뒤에 올리는 장면이었다.
마치 목도리도마뱀이 연상되는 동작이었다.
그런데 하필 그 장면의 사진을 놓쳐버렸다.
인터뷰가 끝난 후 그 장면만 한번 더 해달라고 부탁했다.
“손을 올리고 이야기하는 장면이 있었는데요. 목도리도마뱀이 연상되었습니다.
포즈를 한번 취해 주시면 안 될까요?”
짓궂은 요청에도 씩 웃으며 최원장이 포즈를 취했다.
그러면서 최원장이 한마디 했다.
“신문을 보면서 왜 다들 이상한 포즈로 찍혔을까 하고 생각했는데
나도 모르게 이러고 있네요”라며 웃었다.
그 표정, ‘고통스런 방황’을 ‘아름다운 방황’으로 여기게 된 사람만이 지을 수 있는 것이었다.
3년 전 그의 사진을 본 후, 다시 시상식 사진을 보았다.
배시시 웃는 어린이를 마주한 최원장도 활짝 웃고 있었다.
주눅든 아이를 웃음 짓게 한 그 웃음이었다.
3년 전 그의 말이 떠올랐다.
“나도 누군가의 에드먼즈 교수가 되고 싶습니다.”
권혁재 사진전문기자 shotgun@joongang.co.kr
[출처: 중앙일보] [권혁재 사진전문기자의 뒷담화] 어린이 앞에 무릎 꿇은 최재천 국립생태원장
[원글출처]
https://www.sitepoint.com/deploy-your-rails-app-to-aws/
As developers, we are usually concerned about the development part of any application. We don’t think much about the deployment part as we consider it to be a responsibility of the SysAdmins. But many times, we don’t have a dedicated SysAdmin available, so we have to put on the SysAdmin hat and get things done. There are many options to deploy your Rails application. Today, I will cover how to deploy a Rails application to Amazon Web Services (AWS) using Capistrano.
We will use the Puma + Nginx + PostgreSQL stack. Puma will be the application server, Nginx the reverse proxy, and PostgreSQL is the database server. This stack can be used on MRI Ruby or JRuby as well. Most of the steps remain same for both rubies, but I’ll highlight where they differ as well.
If you have an existing application, you can skip the following section and jump directly to next section.
Let’s create a sample Rails application with a contact model and CRUD. The app uses Rails 4.2 and PostgreSQL:
rails new contactbook -d postgresql
After the application is generated, create a Contact model and CRUD:
cd contactbook
rails g scaffold Contact name:string address:string city:string phone:string email:string
Setup your database username and password in config/database.yml, then create and migrate the database:
rake db:create && rake db:migrate
Let’s check how its working:
rails s
Point your favorite browser to http://localhost:3000/contacts and check if everything is working properly.
We will now configure application for deployment. As previously mentioned, Puma is the application server and Capistrano as our deployment tool. Capistrano provides integration for Puma and RVM, so add those gems to the Gemfile. We will also use the figaro gem to save application configuration, such as the production database password and secret key:
gem 'figaro'
gem 'puma'
group :development do
  gem 'capistrano'
  gem 'capistrano3-puma'
  gem 'capistrano-rails', require: false
  gem 'capistrano-bundler', require: false
  gem 'capistrano-rvm'
end
Install the gems via bundler:
bundle install
It’s time to configure Capistrano, first by generating the config file, as follows:
cap install STAGES=production
This will create configuration files for Capistrano at config/deploy.rb and config/deploy/production.rb.deploy.rb is the main configuration file and production.rb contains environment specific settings, such as server IP, username, etc.
Add the following lines into the Capfile, found in the root of the application. The Capfile includes RVM, Rails, and Puma integration tasks when finished:
require 'capistrano/bundler'
require 'capistrano/rvm'
require 'capistrano/rails/assets' # for asset handling add
require 'capistrano/rails/migrations' # for running migrations
require 'capistrano/puma'
Now, edit deploy.rb as follows:
lock '3.4.0'

set :application, 'contactbook'
set :repo_url, 'git@github.com:devdatta/contactbook.git' # Edit this to match your repository
set :branch, :master
set :deploy_to, '/home/deploy/contactbook'
set :pty, true
set :linked_files, %w{config/database.yml config/application.yml}
set :linked_dirs, %w{bin log tmp/pids tmp/cache tmp/sockets vendor/bundle public/system public/uploads}
set :keep_releases, 5
set :rvm_type, :user
set :rvm_ruby_version, 'jruby-1.7.19' # Edit this if you are using MRI Ruby

set :puma_rackup, -> { File.join(current_path, 'config.ru') }
set :puma_state, "#{shared_path}/tmp/pids/puma.state"
set :puma_pid, "#{shared_path}/tmp/pids/puma.pid"
set :puma_bind, "unix://#{shared_path}/tmp/sockets/puma.sock"    #accept array for multi-bind
set :puma_conf, "#{shared_path}/puma.rb"
set :puma_access_log, "#{shared_path}/log/puma_error.log"
set :puma_error_log, "#{shared_path}/log/puma_access.log"
set :puma_role, :app
set :puma_env, fetch(:rack_env, fetch(:rails_env, 'production'))
set :puma_threads, [0, 8]
set :puma_workers, 0
set :puma_worker_timeout, nil
set :puma_init_active_record, true
set :puma_preload_app, false
We will edit the production.rb later, since we don’t know the server IP and other details yet.
Also, create config/application.yml to save any environment specific settings in the development environment. This file is used by the figaro gem to load the settings into environment variables. We will create the same file on the production server as well.
One thing to remember is to exclude config/database.yml and config/application.yml from the Git repository. Both files contain sensitive data which should not be checked into version control for obvious security concerns.
With the application configured and ready for deployment, it’s time to launch a new EC2 instance. Log in to the EC2 Management Console (obviously, you’ll need to sign up for an AWS account):
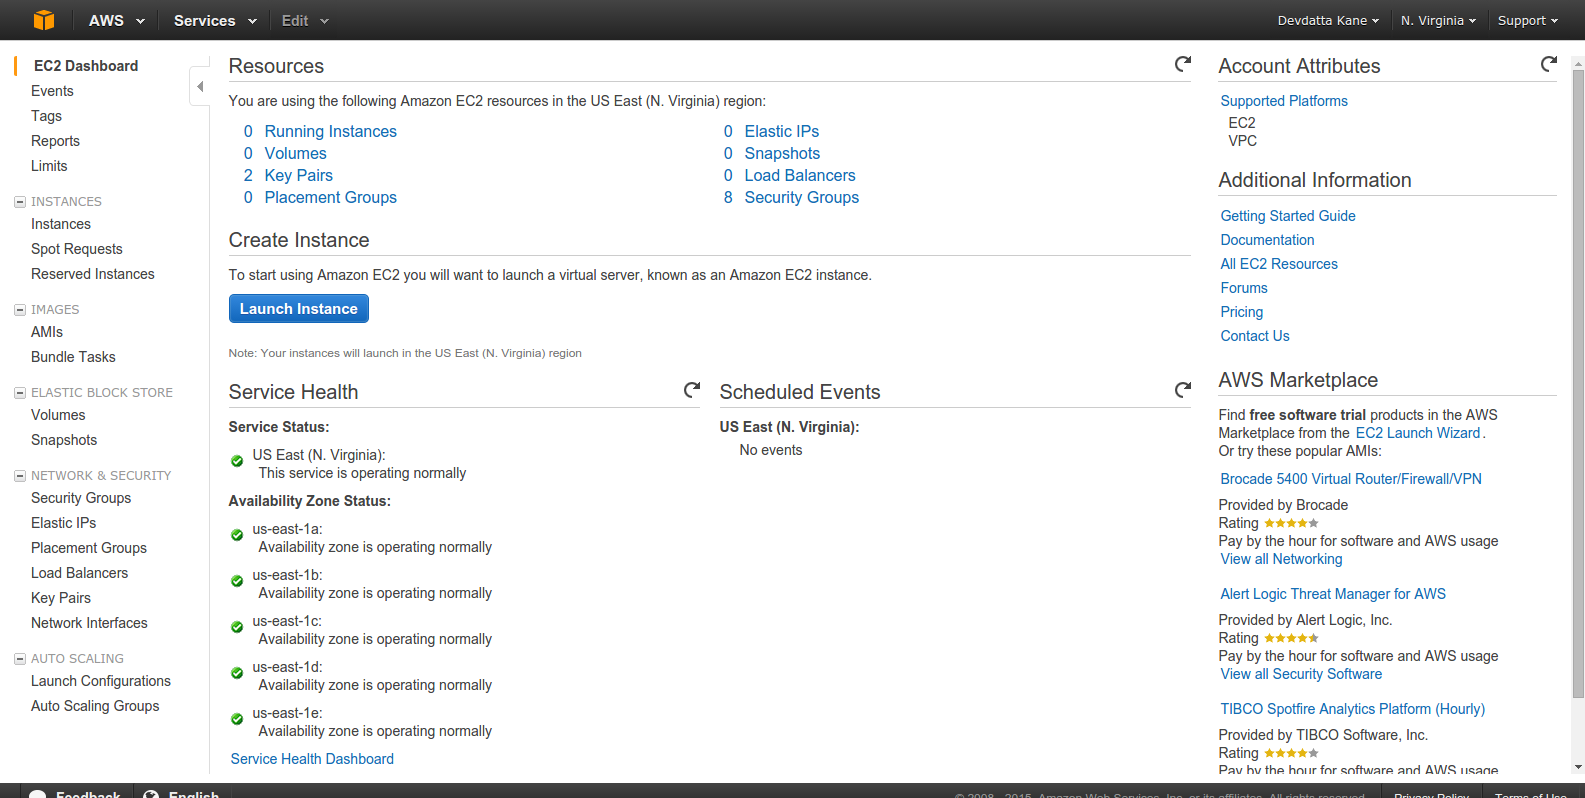
Click ‘Launch Instance’:
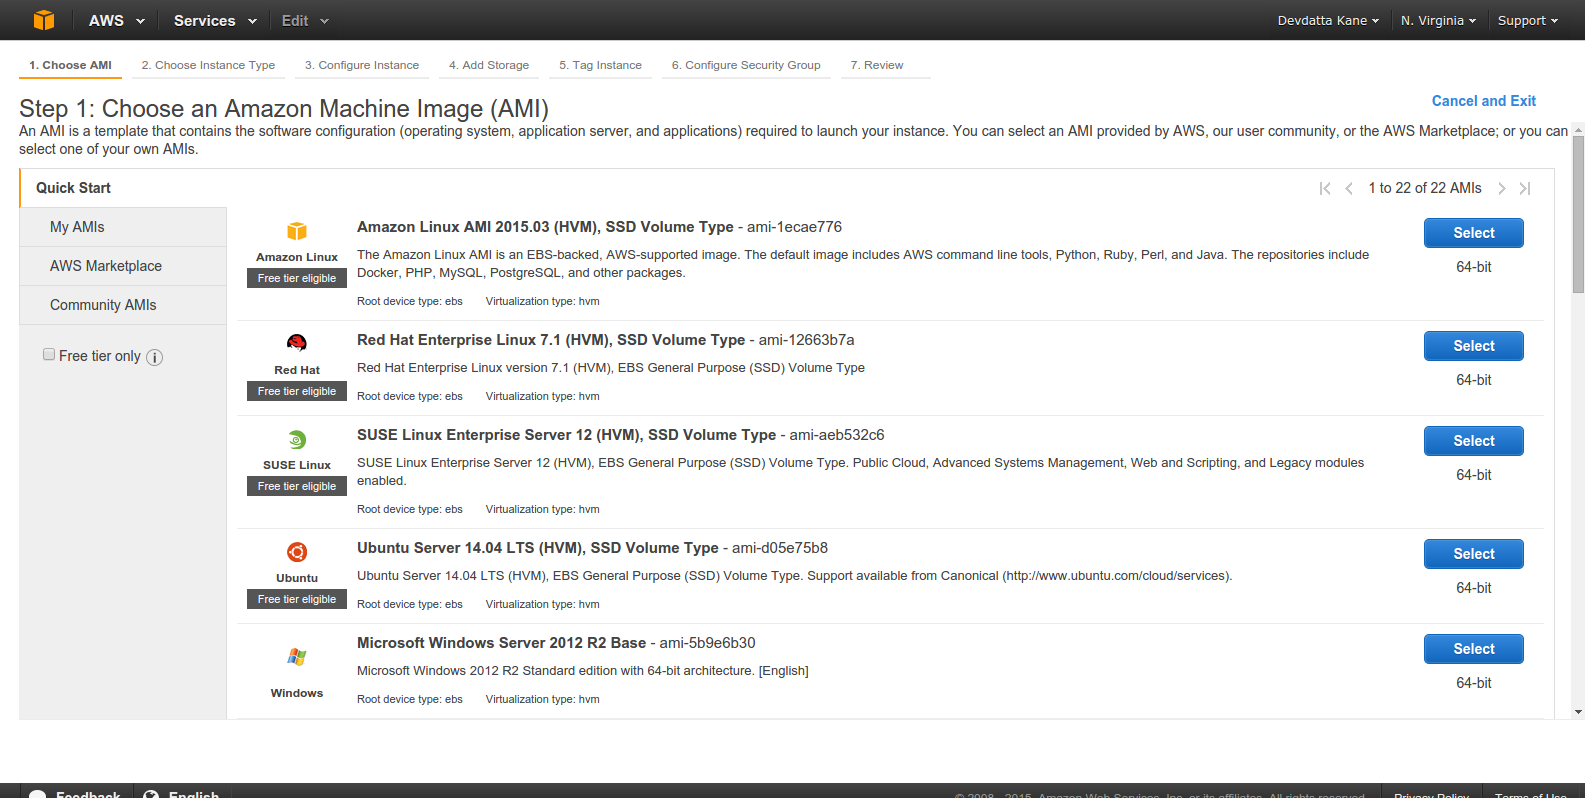
Select an Amazon Machine Image (AMI). We will be using ‘Ubuntu Server 14.04 LTS’:
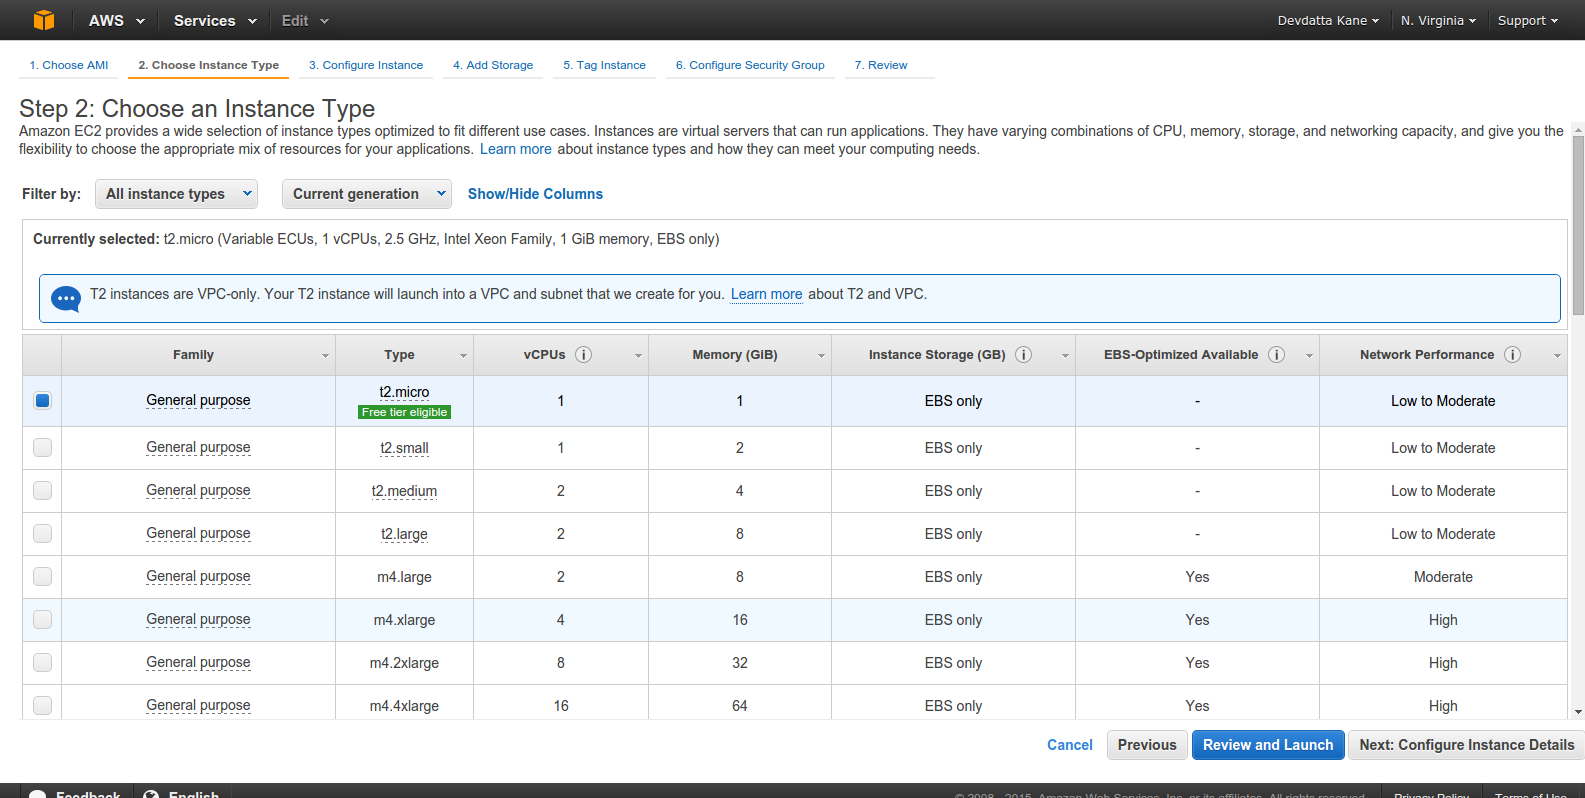
Select the instance type as per your requirement. I am picking ‘t2.micro’, because it is free/cheap. For a real production server, you’d want to go bigger. Click ‘Next:Configure Instance Details’ to continue.

The default settings are good for our tutorial. Click ‘Next: Add Storage’.
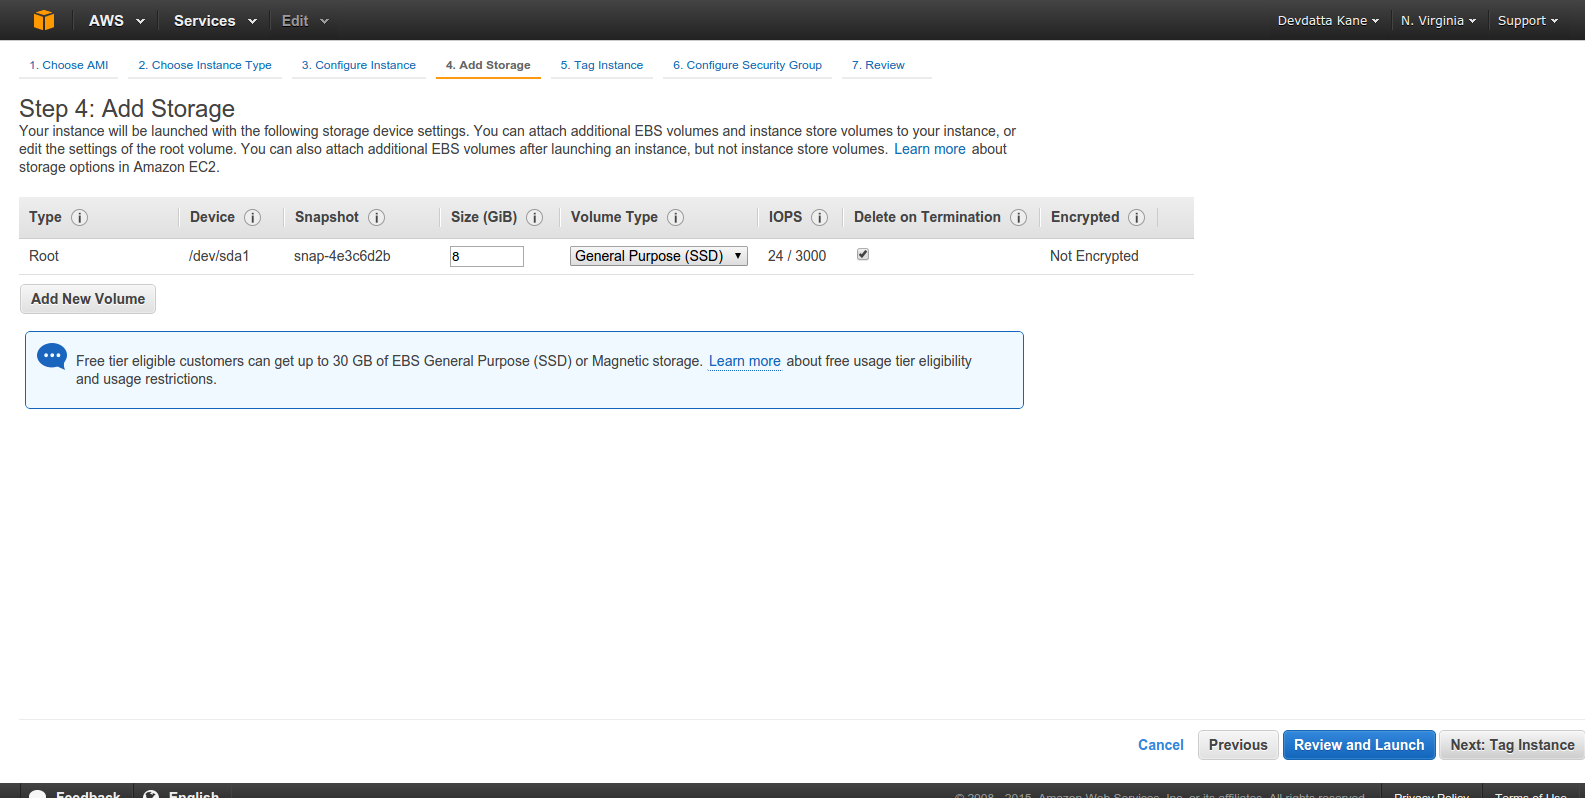
The default storage is 8GB. Adjust as per your space requirement. Click ‘Next: Tag Instance’
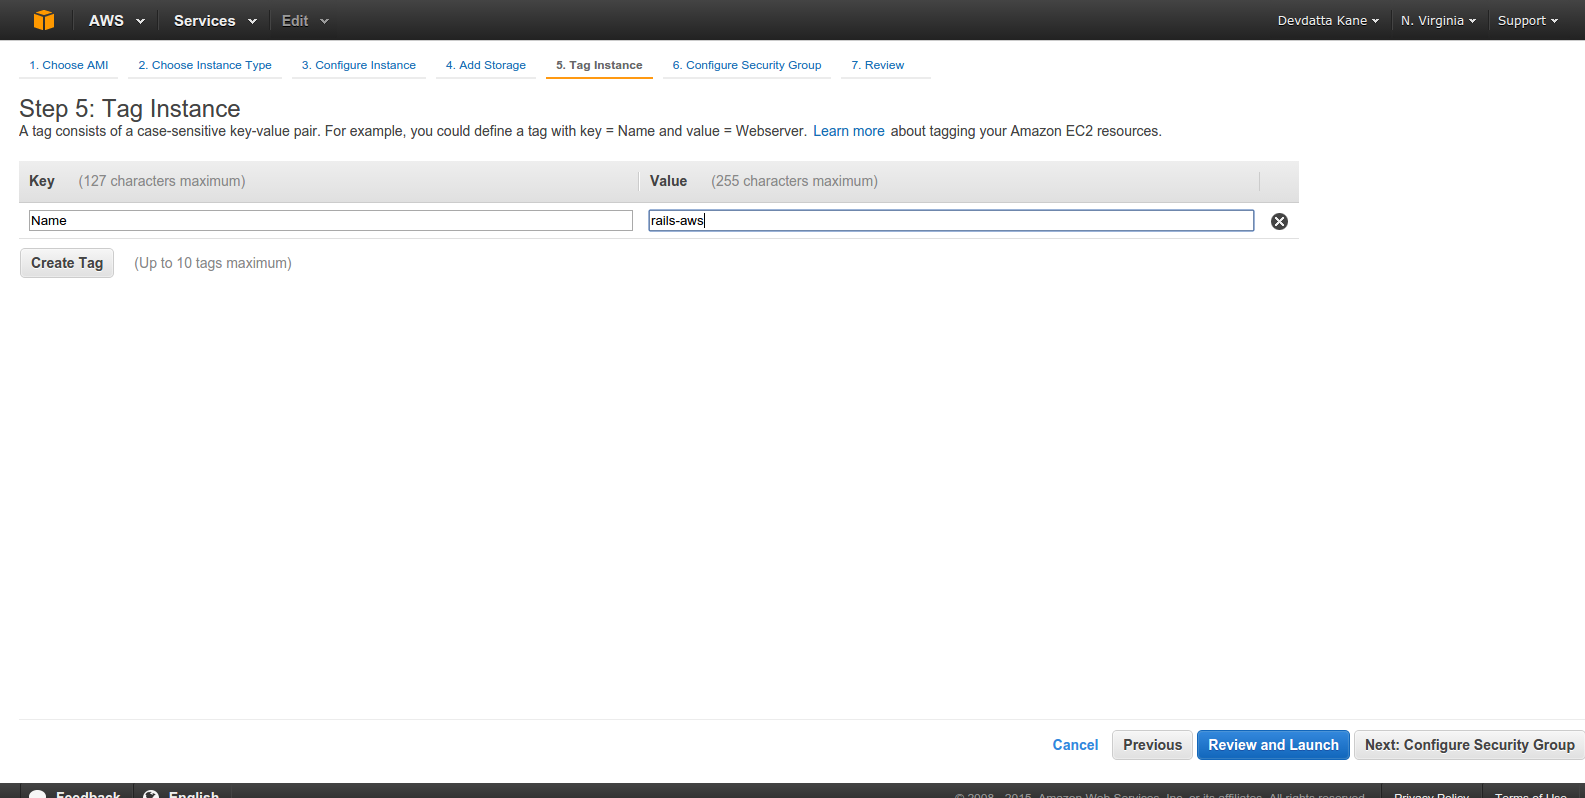
Enter instance name. Click ‘Next: Configure Security Group’.

Click ‘Add Rule’. Select ‘HTTP’ from ‘Type’. This is required to make nginx server accessible from the Internet. Click ‘Review and Launch’
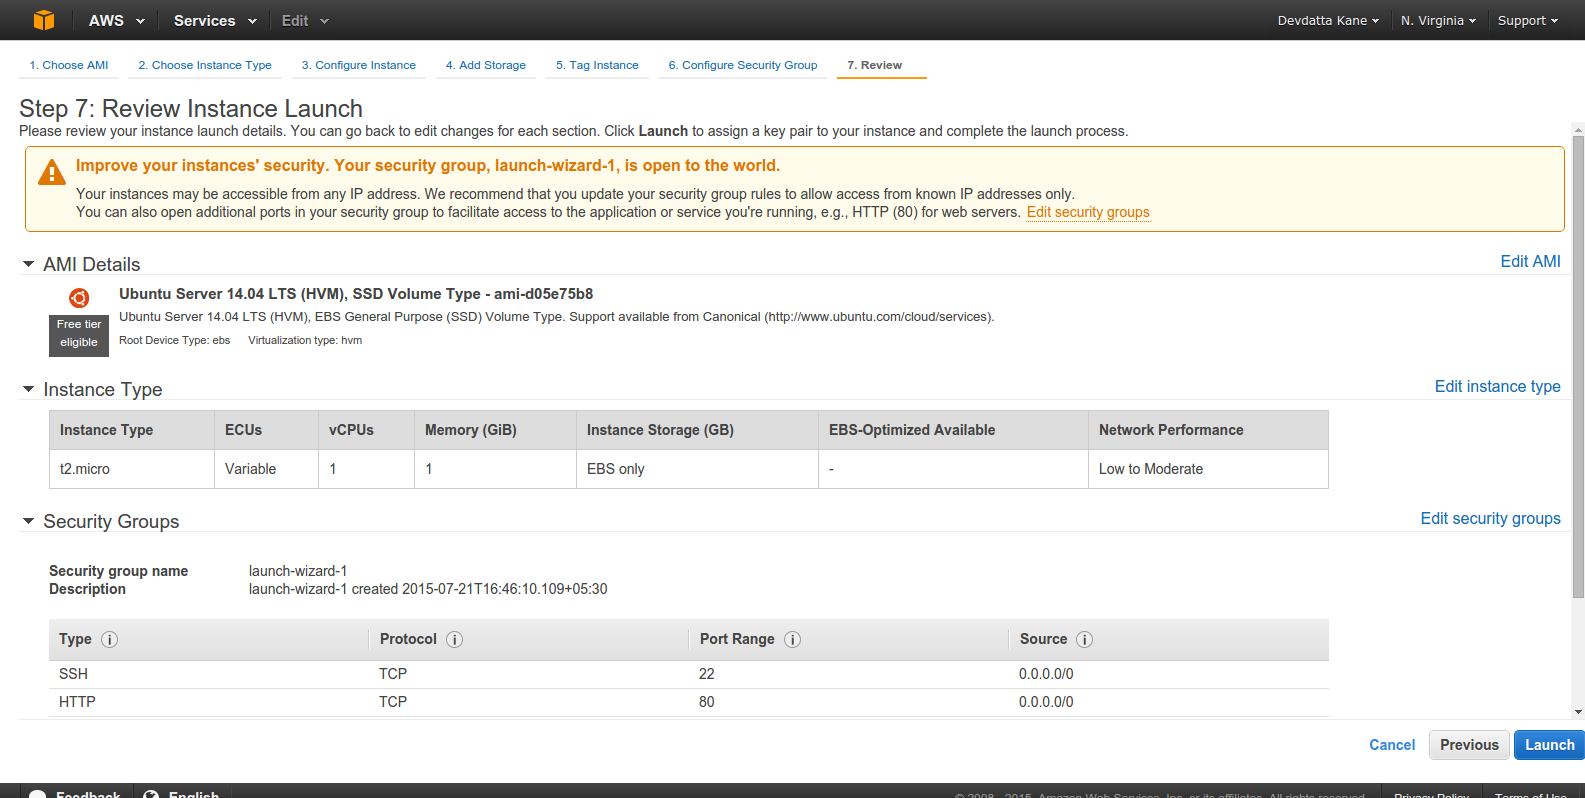
Check if all setting are correct. Click ‘Launch’
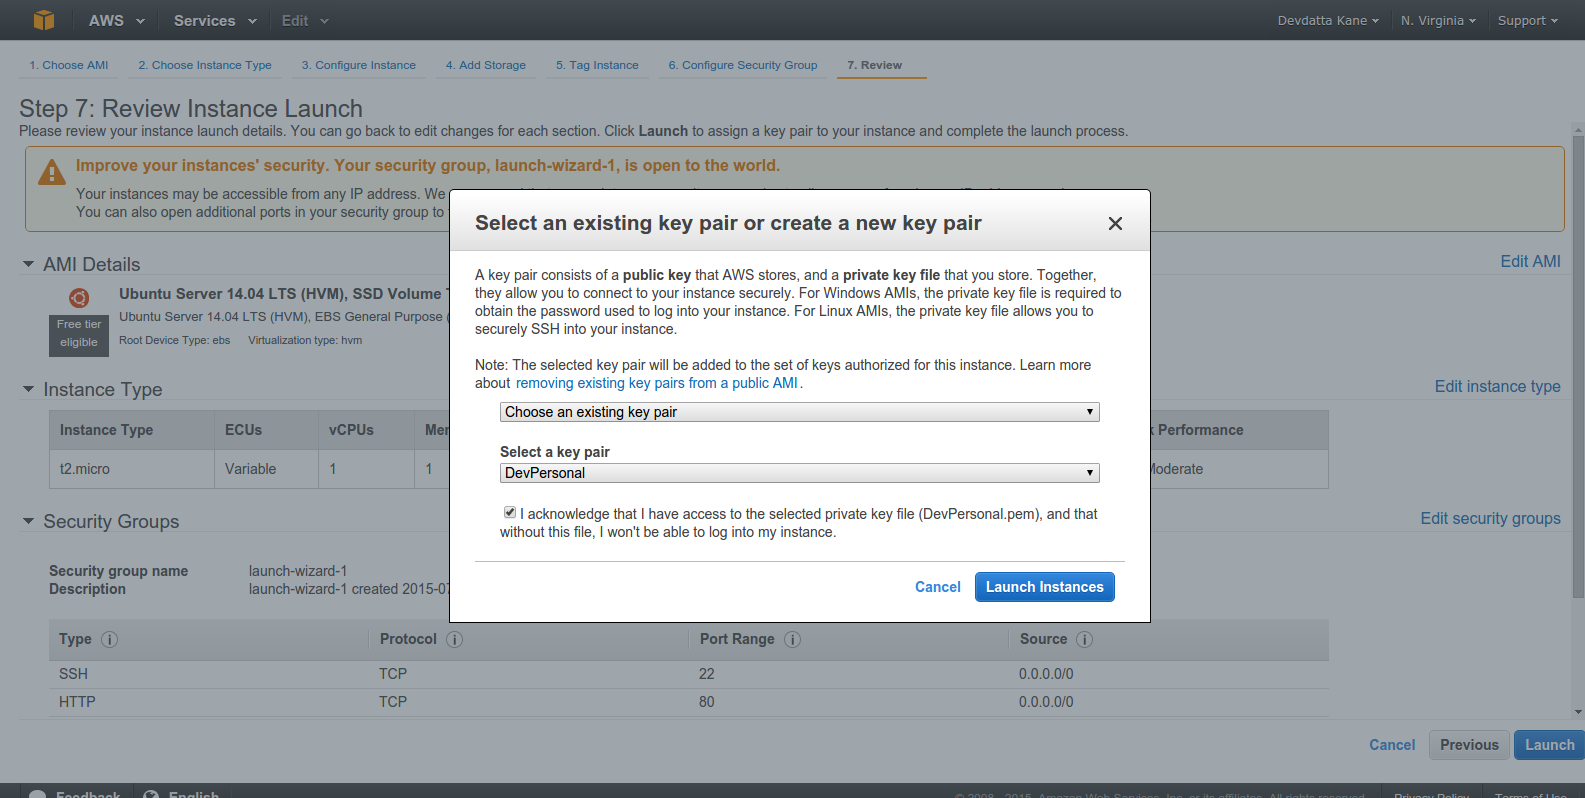
Select or create a keypair to connect to instance. You HAVE to have the private key on your local box in order to ssh into the EC2 instance. The key should live in your ~/.ssh directory. Click the checkbox ‘I acknowledge that…’ and click ‘Launch Instance’. Wait for the instance to launch.
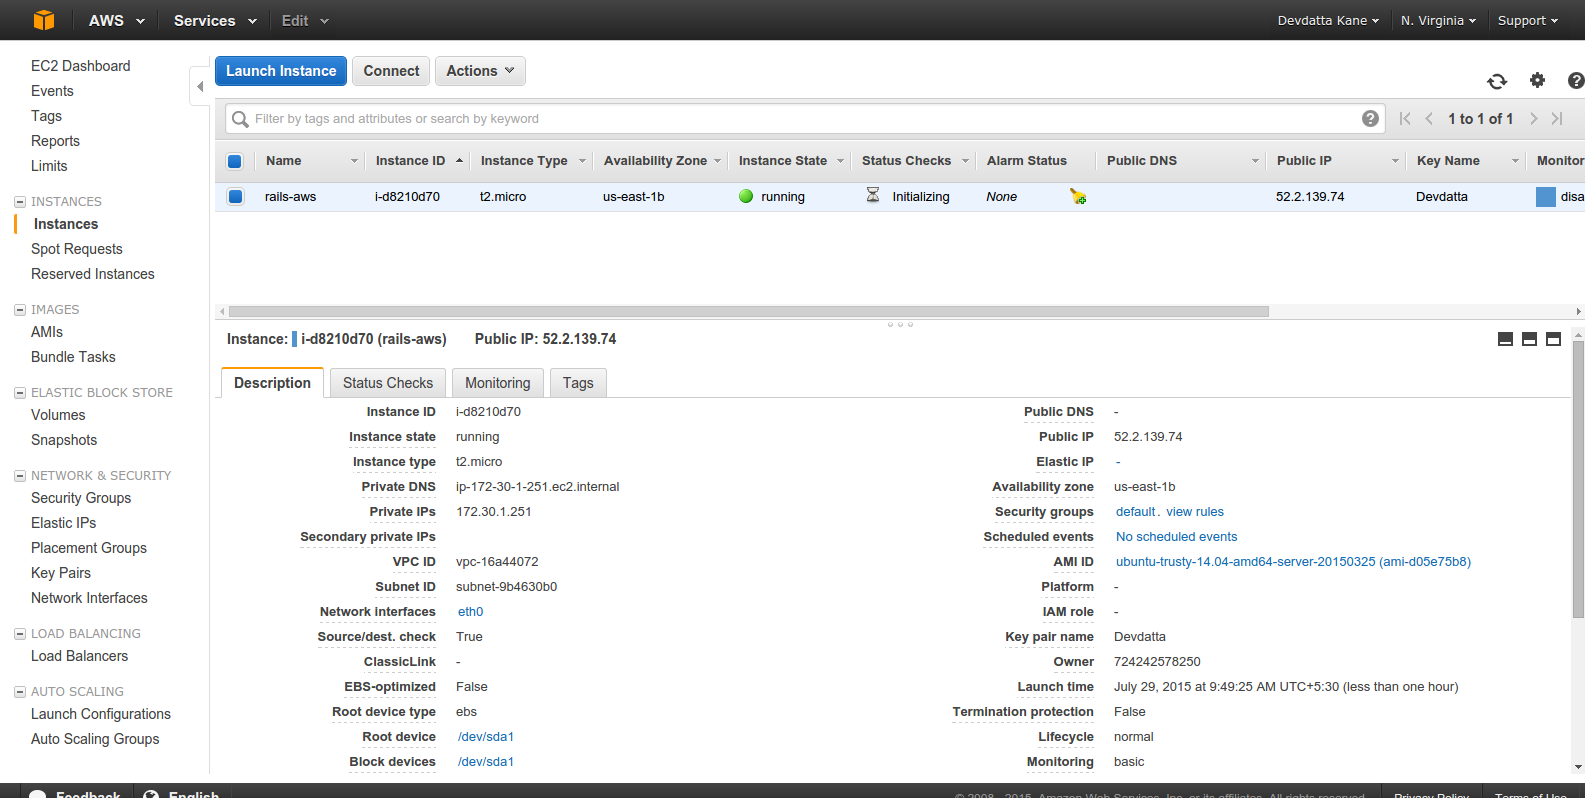
The instance should be in the ‘running’ state. Select the instance and click ‘Connect’.
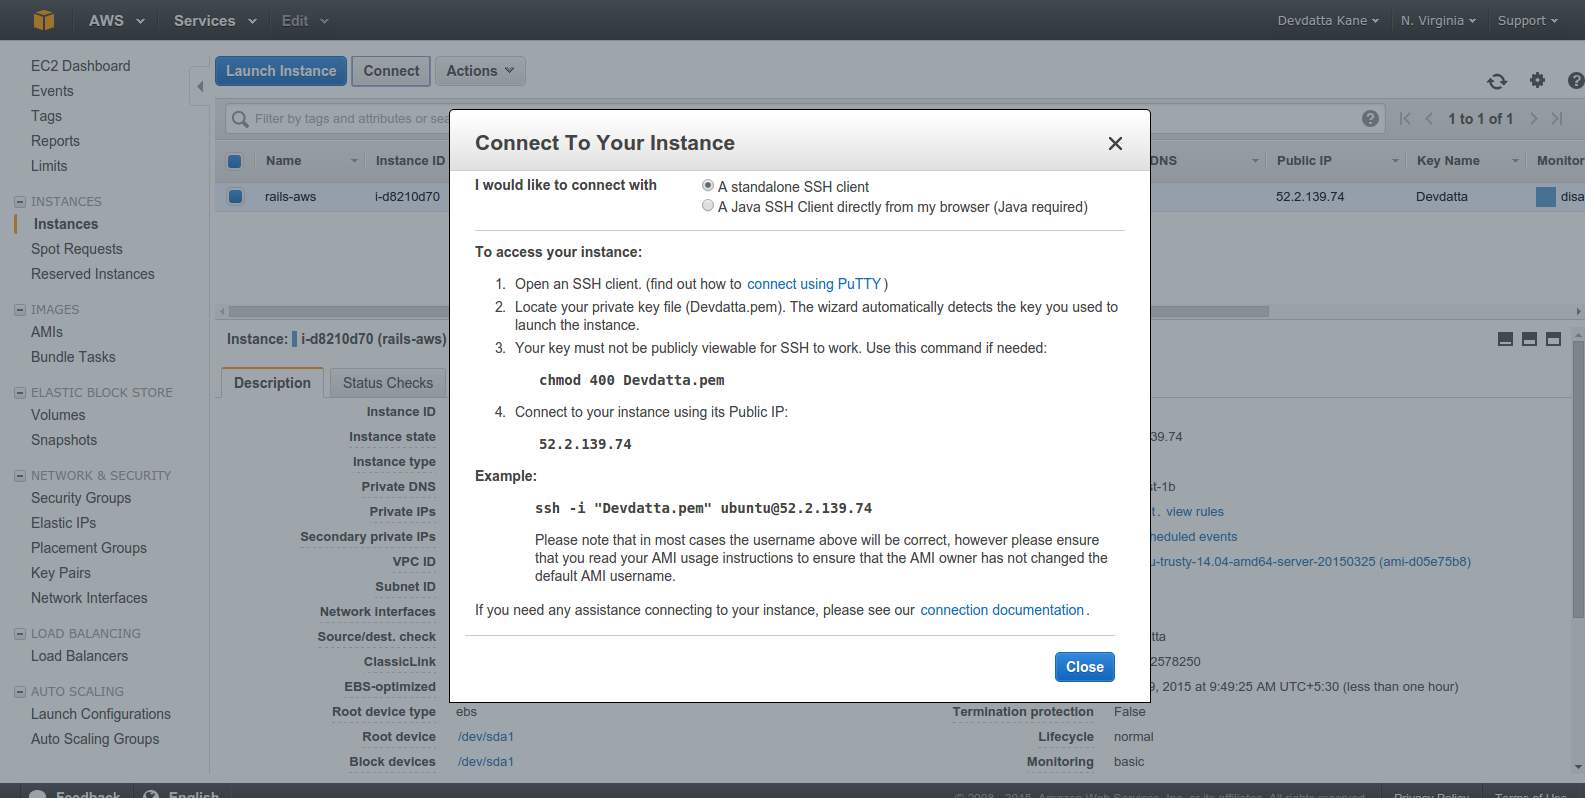
Note down the ‘Public IP’ address (It’s 52.2.139.74 in the screenshot. Yours will be different.). We will need it to connect to the server.
We have now provisioned the server and it’s time to setup some basic things. First of all, SSH into the server with our selected private key. Replace ‘Devdatta.pem’ with the full path to your private key:
ssh -i "Devdatta.pem" ubuntu@52.2.139.74
You are logged into the brand new server. Update the existing packages first:
sudo apt-get update && sudo apt-get -y upgrade
Create a user named deploy for deploying the application code:
sudo useradd -d /home/deploy -m deploy
This will create the user deploy along with its home directory. The application will be deployed into this directory. Set the password for deploy user:
sudo passwd deploy
Enter password and confirm it. This password will be required by RVM for the Ruby installation. Also, add the deploy user to sudoers as well. Run sudo visudo and paste the following into the file:
deploy ALL=(ALL:ALL) ALL
Save the file and exit.
As we will be using GitHub to host our Git repository, the deploy user will need access to the repository for deployment. As such, we will generate a key pair for that user now:
su - deploy
ssh-keygen
Do not set a passphrase for the key as it will be used as deploy key.
cat .ssh/id_rsa.pub
Copy the output and set as your deploy key on GitHub.
Capistrano will connect to the server via ssh for deployment as the deploy account. Since AWS allows public key authentication only, copy the public key from your local machine to the deploy user account on the EC2 instance. The public key is your default ~/.ssh/id_rsa.pub key, in most cases. On the server:
nano .ssh/authorized_keys
Paste your local public key into the file. Save and exit.
Git is required for automated deployments via Capistrano, so install Git on the server:
sudo apt-get install git
If you are using JRuby, install a Java Virtual Machine (JVM):
sudo apt-get install openjdk-7-jdk
First, install Nginx which is our reverse proxy:
sudo apt-get install nginx
Now, configure the default site as our requirement. Open the site config file:
sudo nano /etc/nginx/sites-available/default
Comment out the existing content and paste the following into the file.
upstream app {
  # Path to Puma SOCK file, as defined previously
  server unix:/home/deploy/contactbook/shared/tmp/sockets/puma.sock fail_timeout=0;
}

server {
  listen 80;
  server_name localhost;

  root /home/deploy/contactbook/public;

  try_files $uri/index.html $uri @app;

  location / {
    proxy_set_header X-Forwarded-Proto $scheme;
    proxy_set_header X-Forwarded-For $proxy_add_x_forwarded_for;
    proxy_set_header X-Real-IP $remote_addr;
    proxy_set_header Host $host;
    proxy_redirect off;
    proxy_http_version 1.1;
    proxy_set_header Connection '';
    proxy_pass http://app;
  }

  location ~ ^/(assets|fonts|system)/|favicon.ico|robots.txt {
    gzip_static on;
    expires max;
    add_header Cache-Control public;
  }

  error_page 500 502 503 504 /500.html;
  client_max_body_size 4G;
  keepalive_timeout 10;
}
Save the file and exit. We have configured nginx as a reverse proxy to redirect HTTP requests to the Puma application server through a UNIX socket. We will not restart nginx just yet, as the application is ready. Let’s install PostgreSQL now.
sudo apt-get install postgresql postgresql-contrib libpq-dev
After postgreSQL is installted, create a production database and its user:
sudo -u postgres createuser -s contactbook
Set the user’s password from psql console:
sudo -u postgres psql
After logging into the console, change the password:
postgres=# \password contactbook
Enter your new password and confirm it. Exit the console with \q. It’s time to create a database for our application:
sudo -u postgres createdb -O contactbook contactbook_production
We will use RVM to install our desired Ruby version:
su - deploy
gpg --keyserver hkp://keys.gnupg.net --recv-keys 409B6B1796C275462A1703113804BB82D39DC0E3
\curl -sSL https://get.rvm.io | bash -s stable
This will install RVM into the deploy user’s home directory. Logout and login again to load RVM into thedeploy user’s shell. Logout with Ctrl+D and login again with su - deploy.
Now, install Ruby:
For using MRI Ruby – rvm install ruby
For JRuby – rvm install jruby
After Ruby is installed, switch to installed version:
rvm use jruby
OR
rvm use ruby
Install bundler:
gem install bundler --no-ri --no-rdoc
Create the directories and files required by Capistrano. We will create the database.yml andapplication.yml files to store the database settings and other environment specific data:
mkdir contactbook
mkdir -p contactbook/shared/config
nano contactbook/shared/config/database.yml
Paste the following in database.yml:
production:
  adapter: postgresql
  encoding: unicode
  database: contactbook_production
  username: contactbook
  password: contactbook
  host: localhost
  port: 5432
After that, create application.yml
nano contactbook/shared/config/application.yml
and add the following:
SECRET_KEY_BASE: "8a2ff74119cb2b8f14a85dd6e213fa24d8540fc34dcaa7ef8a35c246ae452bfa8702767d19086461ac911e1435481c22663fbd65c97f21f6a91b3fce7687ce63"
Change the secret to a new secret using the rake secret command.
Okay, we’re almost done with the server. Go back to your local machine to start deployment with Capistrano. Edit the config/deploy/production.rb to set the server IP. Open the file and paste the following into the file. Change the IP address to match with your server’s IP:
server '52.2.139.74', user: 'deploy', roles: %w{web app db}
Now let’s start the deployment using Capistrano:
cap production deploy
Since this is the first deployment, Capistrano will create all the necessary directories and files on the server, which may take some time. Capistrano will deploy the application, migrate the database, and start the Puma application server. Now, login to the server and restart nginx so that our new configuration will reloaded:
sudo service nginx restart
Open up the browser and point it to /contacts. The application should be working properly.

Today, we learned how to deploy Rails application on AWS with Capistrano. Our application, being simple, does not use additional services such as background jobs, so I did not cover that today. But installation and configuration of such services may be required for complex applications. But that’s for another day.
Your comments and views are always welcome.
1. ssh-copy-id 를 이용한 자동 로그인.
2. alias
.bashrc 파일에 다음과 같이 추가
alias "명령어"='ssh root@hostname'
예) alias sss='ssh root@192.168.0.100'
bachrc 바로 적용하기
. ~/.bashrc
명령수행
$ sss <------ "ssh root@192.168.0.100" 가 수행됨.
rails s -e production 명령시 아래와 같이 에러 발생..
.rvm/gems/ruby-2.0.0-p247/gems/activerecord-4.2.4/lib/active_record/connection_adapters/connection_specification.rb:177:in `rescue in spec': Specified 'mysql2' for database adapter, but the gem is not loaded. Add `gem 'mysql2'` to your Gemfile (and ensure its version is at the minimum required by ActiveRecord). (Gem::LoadError)
원인은 mysql2 에서 0.4.X 버전의 문제인지 호환성 문제인지. 해당 버전은 문제가 있음.
현재까지의 결론은 0.3.X 버전을 사용하면 해결됨.
막연하게 설치된 mysql2 를 제거하려니.. 이렇게 다양한 버전이 설치되어 있었음..
mysql2-0.3.20 을 제외한 다른 버전은 먼저..제거.
Gemfile 에 다음과 같이 설정.
=> gem 'mysql2', '~> 0.3.20'
문제 해결!!!
1. Error libv8
[Error Msg]
An error occurred while installing libv8 (3.16.14.11), and Bundler cannot continue.
Make sure that `gem install libv8 -v '3.16.14.11'` succeeds before bundling.
[Solv]
gem install libv8 -v '3.16.14.11' -- --with-system-v8
[파일 확장자 일괄변경]
=> JPG 확장자를 jpg로 일괄변경..
find ./ | grep JPG | sed "s/\(.*\)\.JPG$/mv '&' '\1.jpg' /" | sh
다양한 환경(OS 등)에서 개발을 하다보면, Text Encoding으로 인해 한글이 깨지는 현상이 발생한다.
이때 코드 전체의 인코딩을 변환하기 위한 방법은 여러가지가 있겠으나, 조금은 무식하기도하지만
다음과 같이 작성하면 하위 폴더를 포함하는 파일들의 변경이 가능하다.
위의 예제는 Linux에서 shell script를 작성한 것이다.
현재 경로 아래에 있는 모든 java 파일을 euc-kr 에서 utf-8로 변경하는 것이다.
iconv를 이용해서 변경된 Encoding 타입으로 파일을 새로 저장하고,
기존의 파일을 삭제하고 새로운 이름의 파일을 다시 원래의 이름으로 변경하는것인데...
삭제/변경의 과정은 무식한 과정이고 좀더 효율적인 방법이 있을것으로 생각됨....
누가 도와주면 좋을듯한데!!!
<혹시나...코드를 Copy&Paste 가 필요한 사람을 위하여~~^^>
#! /bin/bash for FILE in `find . -name *.java` do echo "$FILE"; iconv -c -f euc-kr -t utf-8 -o "$FILE.new" "$FILE" rm "$FILE" mv "$FILE.new" "$FILE" done |
1. Check Java Version
- Java Version : 1.7 , 64Bit
2. Download " Eclipse Modeling Tool" ( Eclipse 4.2 Juno)
=> http://www.eclipse.org/downloads/packages/release/juno/sr2
3. Import [SMeTac] project..
- ContentsExcutor
- SMetacCorePlugin
- SMeTacPlugin
4. Build (Default : Auto Build)
5. Deploy File Generation
5.1 Select Export
5.2 Select Deployable plug-ins and fragments
5.3 Finish
6. Add Plug-in
6.1 Extract SMETAC.zip
- ContentsExecuror_XXXX.jar
- smetac_XXXX.jar
- SMeTacCore_XXXX.jar
6.2 Put into Eclipse Plus-ins folder
Package files put into folder(Eclipse > plugins)
blesscdh's Blog is powered by Daum & Tattertools